
I have always lived an unorganized life.Unlike the rest of the gals in college, school and work I dunno I simply didn't have the innate capability in me to keep things in the right place. I remember how Papa used to come around my room once in a while just to see if I kept things neatly...and once it so happened that just before papa was coming to check my room ...I grabbed everything lying around and stuffed it inside my cupboard. And when Papa came, the room looked fine.Just on an instinct he opened my cupboard... and looo... all the cloths, things stuffed in pored out like a waterfall...hahhaaaa..... I really got some good amount of scolding that... Thinking back it all seems so funny :)
Things have changed... changed soo dramatically after Rihan was born. I think he changed my DNA on his way out ...hahhaa.... I have become those organization crazy female these days. From the time I get up... I am simply thinking about how to make my life more organized. Whats the best place for each item. I started off with my Kitchen...since Its the place I dont like to be... But I have got to be there always. So I thought a little organization mit actually lift up my spirits to cook. But I must tell u ...it worked like magic. Once I got my Kitchen organized.. I feel more interested in cooking ... Coz the place is always tidy and organizzzeedd. In fact this week I made a Menu plan for the entire week and almost stuck with it. My hubby is pretty happy with my organization craze... Of course he is !! he gets to eat good things and too on time ! :)
So as a part of this new interest I decided I needed a central organization board to hold my most frequently used bills - electricity, cable, paper, Food coups etc... Also pin up TO-DO lists, Menu Lists etc. I needed some thing on which I could pin up things, also have pockets too. Went online and searched for some ideas. Hit on a jackpot in Sew4home site. I liked the design and made one myself. Didn't follow the steps though. Just made one similar to that. and look how it looks... I'm in love with it !

Can Pin up my important bills and TODO list on some sections

Many Tiny pockets to hold up my bills , accessories and pins

Ribbons that support my pics.

He looks lovely isn't he... That's the pic I took when I he had his first bubble bath.
And lot of tiny pockets in the bottom
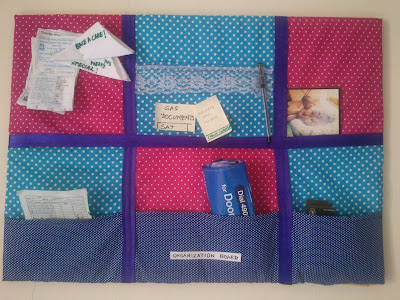

And the whole project hardly took an hour to complete.
The base is thermocol. I wrapped up the cloth over the thermocol. you could use a single piece of cloth to wrap it up or join different pieces of fabrics to make the block pattern like the one I have made. To make the bottom pockets I attached the long strip pf fabric and stitched them at the 3 sides. later on you can sew ribbons at the intersections. It serves two purposes :
1) Gives the whole thing a cleaner and better look
2) hides all the imperfections of sewing ;)
Finally wrap the entire fabric over the thermocol and stick duct tape to secure the fabric !
Finally stick Velcro dots behind the board to secure it to the wall !
Easy and simple isn't it. Let me know your commentss... I lovve loveee them ! :)
Things have changed... changed soo dramatically after Rihan was born. I think he changed my DNA on his way out ...hahhaa.... I have become those organization crazy female these days. From the time I get up... I am simply thinking about how to make my life more organized. Whats the best place for each item. I started off with my Kitchen...since Its the place I dont like to be... But I have got to be there always. So I thought a little organization mit actually lift up my spirits to cook. But I must tell u ...it worked like magic. Once I got my Kitchen organized.. I feel more interested in cooking ... Coz the place is always tidy and organizzzeedd. In fact this week I made a Menu plan for the entire week and almost stuck with it. My hubby is pretty happy with my organization craze... Of course he is !! he gets to eat good things and too on time ! :)
So as a part of this new interest I decided I needed a central organization board to hold my most frequently used bills - electricity, cable, paper, Food coups etc... Also pin up TO-DO lists, Menu Lists etc. I needed some thing on which I could pin up things, also have pockets too. Went online and searched for some ideas. Hit on a jackpot in Sew4home site. I liked the design and made one myself. Didn't follow the steps though. Just made one similar to that. and look how it looks... I'm in love with it !

Can Pin up my important bills and TODO list on some sections
Many Tiny pockets to hold up my bills , accessories and pins

And lot of tiny pockets in the bottom

A small handwritten label I wrote and stuck it to the bottom.

And the whole project hardly took an hour to complete.
The base is thermocol. I wrapped up the cloth over the thermocol. you could use a single piece of cloth to wrap it up or join different pieces of fabrics to make the block pattern like the one I have made. To make the bottom pockets I attached the long strip pf fabric and stitched them at the 3 sides. later on you can sew ribbons at the intersections. It serves two purposes :
1) Gives the whole thing a cleaner and better look
2) hides all the imperfections of sewing ;)
Finally wrap the entire fabric over the thermocol and stick duct tape to secure the fabric !
Finally stick Velcro dots behind the board to secure it to the wall !
Easy and simple isn't it. Let me know your commentss... I lovve loveee them ! :)


