Wednesday, May 30, 2012

Pillow Case to Sewing Machine Cover

Today I'll be sharing with you the story of how an old pillowcase cover turned into a sewing machine cover which will protect my sewing machine from all the dust.

Pillowcase sewing machine cover

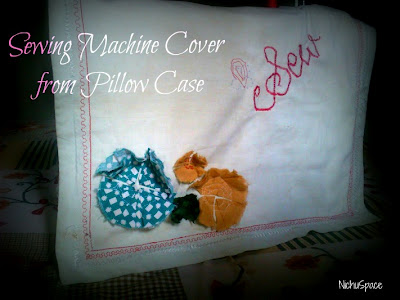
It's just another example of how a virtually useless item can turn into something beautiful. I found an pillowcase in my stash. It was old and I just couldn't think if anything to make out of it. That's when I thought I could just try out a few things on it that I have never done before.
Like making Fabric flowers.
 I saw these fabric flowers in MakeIt-LoveIt and decided to do that. Ashely has explained it very well. Cut out circular pieces of cloth. For 1 flower you'll need 4 circular pieces of the same size. Fold each of these circles into a cone and squeeze in the centre. Thus U'll have a smaller and bigger circle. Similarly make the rest of the petals. As you do these, pin them on the fabric to make the flower. stitch concentric circles or spiral to secure them in place.


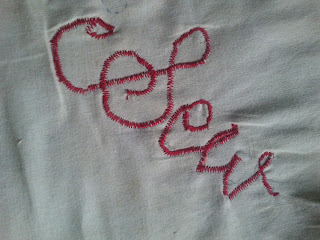
Yet another day I wondered if embroidery could be done with an ordinary machine. I observed a few cloths and saw they were mostly zig zag stiches. So I set my machine to a stitch length of 2 . Wrote the word "Sew" on the fabric and ran a zig zag over it.


Once I finished this I realised it could become a good sewing machine cover. Decided to make use of the decorative stitches on my machine to give it a simple border


Then I placed it over mine machine and marked the places where the thread poles lie. Cut out 2 circles , so that the thread can remain in place when I cover my machine and loo... Machine cover ready !

Isn't it amazing how simple things can virtually change a useless scrap of fabric to something useful !


Follow my blog with Bloglovin

Wednesday, May 23, 2012

Pinterest Love !

I heard of pinterest only recently. I know It'll be a little hard to believe that... But yes thats the truth...
But I must tell you... I have completely fallen for it. I have been spending so much of time on it. Discovering some wonderful things made by some wonderful people.
Check out my pinterest board to see all the lovely stuff I have repinned. I intend to make a lotttt of them !
It's bubbling with ideas...
                    http://pinterest.com/nichu123/
If you like my boards don't forget to click on the Follow Me On Pinterest button on the right sidebar !

And guess what... I already made one of things I saw...
A Newspaper Basket !


 Ehh... I know the pics are not great... Need to take few more in better lighting...

Also there's news... Richu touched his legs with his hands for the very first time today !

I guess he loves the camera... Every time I bring out the camera to snap a photo of him... He kinds of stops doing whatever he was doing and just blankly stares at the camera... I had to hold the camera real still for quite some time before I could snap this pic.


Sunday, May 20, 2012

A Day in my Life !

It was a beautiful day ! Took some time off. Spend some time wandering in the open...That's when it struck me I should try something different today - Photography.... I keep seeing all these fancy photographs on the net ... so I decided I should try some too... So I shot some self portraits ... used some photo editing software....and here is the result...

A reminder of the longg list of TODO's for the day !


Feeling reallly really happy when I got all the items ticked away !


Cooking something new has become my new best hobby


The Best part !!! playing with my young one.... I just love him sooo much 


Don't u loveee that expression... hahhaaaa.... " Ehhh... u have kissed me a lottt today ...Not again !"
I guess that's what he's trying to say :)


Wednesday, May 16, 2012

Wall Hanging using craft paper

Like a year ago I made this wall hanging using craft paper. I didn't have a blog then else you would have had the detailed steps as to how I made this. Well you don't have to be disappointed because I am in the process of making something similar to this. Of course with the steps ! :)

Here's how the older one looks like.... I simply loved them...

Jungle
The Elephant
The Giraffe

The King of the Jungle


You'll need the following to make these...
Cardboard
Craft paper
Wool
Thermocol balls

Draw your jungle animals on the cardboard. Cut them out. paste the craft paper. A Black outline for the animals gives them a certain charm. I used wool to give that outline. Also for the hair of the lion I used wool. Didn't cut out the individual pieces just looped it and stuck it with glue !
Finally make small holes on each of the animals and thread wool thru them . Don't forget to thread your thermocol balls on the way. I basically attached the wool to a needle and threaded through the balls.

To give additional support to the wool, attach cellophane tape behind the knots.

Do let me how you like my cute jungle animals ! :) Also stay tuned for the next project.


Monday, May 14, 2012

Home made Mothers Day Gift !


Hey... Yesterday I completed a small project while my husband was gone to get some things from the grocery stall i.e in less than 5 mins... A small piece of writing I saw somewhere on the net.


I have tried to find the blog where I saw this. But I simply couldn't find it.  Do let me know if you find it.
Well I simply loved the quote.... In a way it was a small treat I gave myself on  Mothers day. I have pinned it up on my fridge ... Hope you liked it too !!!


Friday, May 11, 2012

Storage Box with a Fabric Makeover

Yesterday I realized how cluttered my dining table was. No matter how much I keep things in place things still end up on the top of the table. Keys, wallet, pens, bills !!! yikes.... So I decided to do something about it.
I searched around the closets and found a call cardboard box, It was of the perfect size... but I couldn't afford to place that on  my dining table like that... So gave it a makeover and I ended up with this...


 All the clutter now stays in one place !


Yes from this to this !


Do you like it ? Well Its quite easy to make too...

I could opt to just the stick the fabric around the faces of the box. But It wouldn't give the neatness or perfection. So first I ripped open the cardboard box
 My assistant at work ! :)

 Ironed it flat...
 Applied glue in parts. Never make the mistake of applying glue all over and then stick. It has two diadvantages . One the glue might get dried up. Second It can lead to small ripples all over the project. Hence applying glue over a small area and spreading it evenly is very essential to give a perfect finish !


So thats the front part. Now the Lining for the inside.

Glued the box back in place !

To give a strong base... I took another piece of cardboard and gave it also a shred of clothing :) and dropped inside !
 Here you go !


Wednesday, May 9, 2012

DIY Mobile Holder

Hi Guys...   I know it has been a while since I have posted something. It because I have been very very busy lately. I moved to my home. Earlier I was mostly at my mom's place. I don't know if this custom exists else where in the world. But In India we have a very unique custom where the new mom is treated like a princess until 3 months. She's not made to do any work. You just need to take rest. You get to eat the best nutritious foods and yeah lot of sweets too. My mom used to say that this period of rest is like once in a lifetime thing. Now that I have moved to my home... I completely believe that. Taking care of my baby is a full time job along with managing the rest of the household. I know most of you who might be reading this will already be veterans ... yeah but this is new for me... and I am trying my best ! :)

Well so In between all the new responsibilities I found like a little time to do a small project. A very useful one - Mobile & Charger Holder.


It's a super useful thing. I'll explain why. Generally at home you'll have a place you always charge your mobile. But the wire will be kind of hanging loosely. Its not long enough to lie on the floor though . So we  either have to pull up a chair of a table to support your mobile during charging. The other day I pulled up my baby's stroller so that I could support the mobile while it was getting charged. That's when I remembered a project I saw on the internet a while ago. I didn't bother to go back and look . I just made one !
No more hanging wires. No more dragging chairs and tables around. A simple solution - The Mobile Holder !
Now lets see how to make one. I have provided a lot of pics to guide you through the tut.
Supplied you need -
1) A plastic bottle at least on flat face. I had a used up Vaseline lotion bottle.
2)  Fabric
3) Glue & scissors.

So first bring out your plastic bottle and cut the top edge off !

Make an incision in the middle. This will help you chop off the rest !


 Next make a u shaped cut on one of the sides like this. Don't make the u shaped too deep. It would be ideal to measure your mobile length. and make a u shape so that the mobile is visible.
 Next on the other side, make a rectangular shape cut. This should be large enough for your charger to fit !

 Now you are ready with the basic shape. Now lets decorate it with some piece of fabric. Place your bottle on the fabric and approximate the amount of fabric needed taking into account that you'll be folding the fabric into the inside.
 Cut ! Apply Glue !
 Paste Slowly ! Smoothen out any folds. I used Fevicol for better grip.
 Make small cuts along the edges and center so that u can fold the fabric inside !

Front area Done ! Now for the back piece. After sticking the fabric, you can make small incisons inside the square area and fold the fabric in...
Perfect ! You are done !
Let me know how you like this :) I love your comments...

Another of my No sew project can be found here !

Related Posts Plugin for WordPress, Blogger...